
Using Dash Governance#
Dash’s Decentralized Autonomous Organization (DAO) is a novel voting and funding platform. This documentation introduces and details the theory and practice to use the system.
Understanding the process#
Introduction#
DAO consists of three components: Proposals, Votes, and Budgets
Anyone can submit a proposal for a small fee
Each valid masternode can vote for, against or abstain on proposals
Approved proposals become budgets
Budgets are paid directly from the blockchain to the proposal owner
Proposals#
Proposals are a request to receive funds
Proposals can be submitted by anyone for a fee of 1 Dash. The proposal fee is irreversibly destroyed on submission.
Proposals cannot be altered once submitted
Votes#
Votes are cast using the registered voting address
The voting address can be delegated to a third party
Votes can be changed once per hour
A regular masternode’s vote counts as one vote; an evonode’s vote counts as four
Votes are counted every 16616 blocks (approx. 30.29 days)
Budgets#
Budgets are proposals which receive a net total of yes votes equal to or greater than 10% of the total eligible votes, rounded down, with a minimum of 10 votes on mainnet (for example, 448 out of 4480)
Budgets can lose approval if vote totals (cast or re-cast) fall below the approval threshold
Budgets are processed (paid) in order of yes minus no votes. More popular budgets get payment priority.
The budget available for each cycle can be checked using the commands in Budget cycles, and decreases by approximately 7.14% every 210240 blocks (approx. 383.25 days).
Object structure#
The following information is required to create a proposal:
proposal-name: a unique label, 40 characters or less
url: a proposer-created webpage or forum post containing detailed proposal information
payment-count: how many cycles the proposal is requesting payment
block-start: the requested start of proposal payments
dash-address: the address to receive proposal payments
monthly-payment-dash: the requested payment amount
Persistence#
Proposals become fully accepted after the proposal fee transaction has six confirmations
Proposals remain on the network until their payment period ends or masternodes vote to remove them
Approval occurs when yes votes minus no votes meets the threshold described under Budgets
Falling below the approval threshold does not remove a proposal
The total eligible votes comes from registered masternodes that are not banned for failing to provide service. Regular masternodes count as one vote each, and evonodes count as four.
Templates#
The following two Microsoft Word templates are available from Dash Core Group to help facilitate standardized proposal submission and updates. Usage is recommended, but not required.
Budget cycles#
When preparing a proposal, be aware of when the next cycle will occur and plan accordingly. It is recommended to choose your proposal payment start block at least one cycle in the future to allow time for discussion and gathering support and votes. Vote at least 1662 blocks (approximately 3 days) before the superblock. After this point, masternodes begin choosing which proposals to pay, so later votes may not affect the upcoming payment.
To find the next superblock height, run the following command in the Dash Core wallet console:
getgovernanceinfo
The nextsuperblock field gives the next superblock height. Subsequent
mainnet superblocks occur every 16616 blocks. To check the maximum budget
for a superblock, use that height in the following command:
getsuperblockbudget <superblock-height>
Creating proposals#
Once you have prepared the text of your proposal and set up a website or forum post, it is time to submit your proposal to the network for voting. You can create a budget proposal using the Dash Core wallet (GUI or console) or the Dash Budget Proposal Generator.
Dash Core Wallet#
Dash Core Wallet includes a built-in graphical interface for creating governance proposals directly from the Governance tab. This provides a user-friendly alternative to using external web tools or manual console commands. To use this feature, your wallet must be unlocked and contain sufficient balance to cover the 1 DASH proposal fee plus a small transaction fee.
Accessing the Governance tab#
Open your Dash Core Wallet and click on the Governance tab. This displays a list of existing proposals and provides Create Proposal and Resume Proposal buttons.
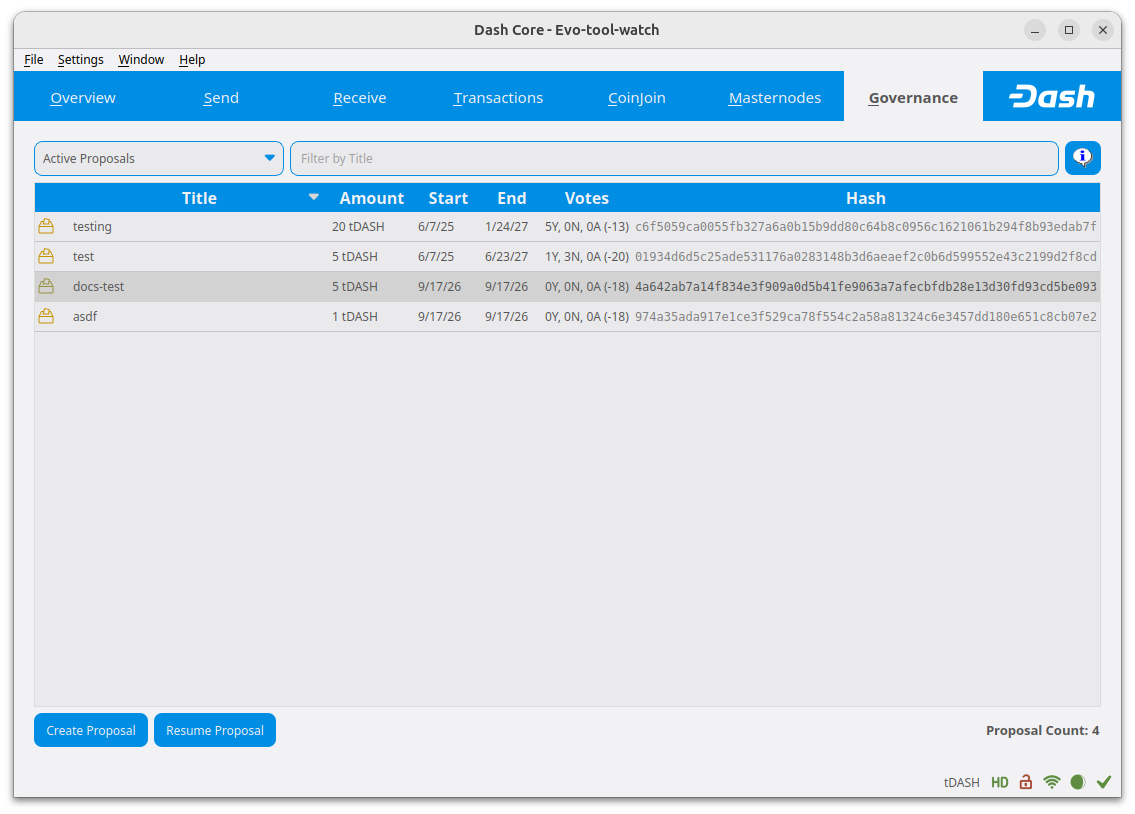
The Governance tab showing existing proposals and the Create Proposal button#
Creating a new proposal#
Click the Create Proposal button to open the proposal creation dialog. Enter your proposal details:
Proposal name: A label of 40 characters or less
Description URL: Link to detailed proposal information
Payment address: The Dash address that will receive payments
Payment amount: Amount requested per payment cycle
Payment date: Select the first payment
Payments: Number of payment cycles requested
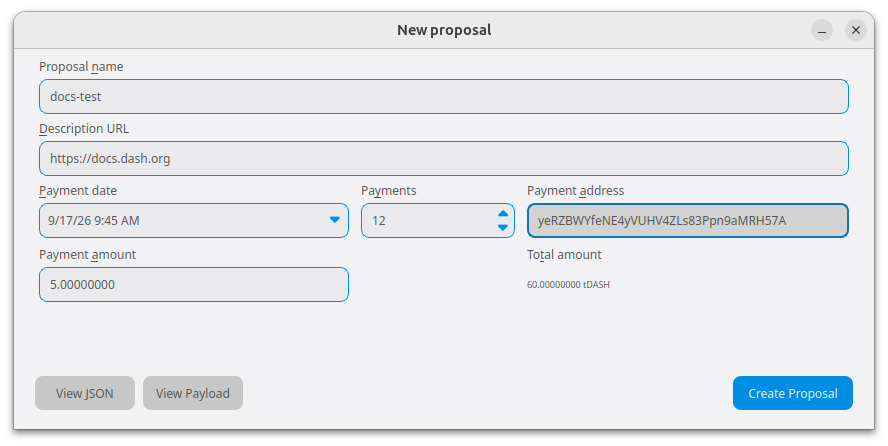
Entering proposal details in the creation dialog#
The dialog displays the total amount requested. Check your proposal details carefully before proceeding. View JSON and View Payload let you inspect the data that will be submitted to the network.
Then, click Create Proposal, unlock the wallet if prompted, and review the proposal confirmation screen.
Warning
Creating the proposal permanently spends the 1 DASH proposal fee, plus a transaction fee. The proposal fee cannot be refunded. Verify all proposal details before proceeding.
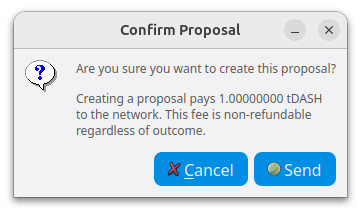
Proposal create confirmation screen#
Click Send on the confirmation dialog to broadcast the fee transaction.
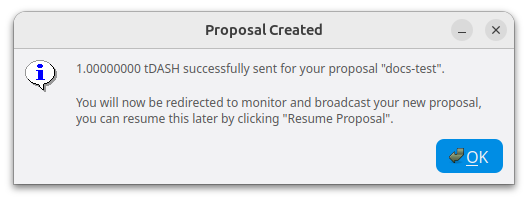
Proposal created#
After successful creation, the wallet opens a dialog to monitor and broadcast the proposal. You can return to pending proposals later using Resume Proposal from the Governance tab.
Broadcasting the proposal#
The proposal initially shows a Pending collateral status. After the fee transaction has one confirmation, the status changes to Ready and the Broadcast button becomes available. Click Broadcast to submit the proposal. A successful submission displays your proposal ID, which you can use to track voting on the proposal.
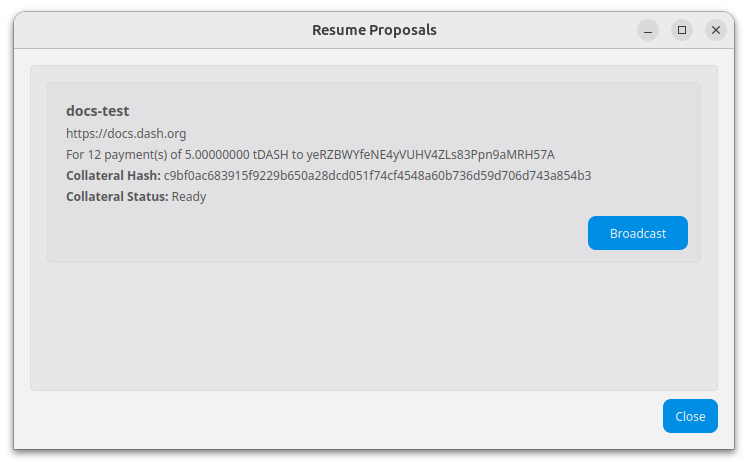
The proposal becomes fully accepted by the network after the fee payment has six confirmations.
Note
You can use the proposal ID to identify your proposal on DashCentral. Consult the service’s current instructions for claiming it.
Dash Budget Proposal Generator#
The Dash Budget Proposal Generator supports creating budget proposals on both mainnet and testnet. In the first step, you must enter a short, clear and unique name for the proposal as it will appear on the blockchain. Proposal names are limited to 40 characters. You can then provide a link to the forum or DashCentral where your proposal is described in more detail (use a URL shortening service if necessary), as well as select the amount of payment you are requesting, how often the payment should occur, and the superblock date on which you are requesting payment. This allows you to control in which budget period your proposal will appear, and gives you enough time to build support for your proposal by familiarising voters with your project. Note that the payment amount is fixed and cannot be modified after it has been submitted to the blockchain.
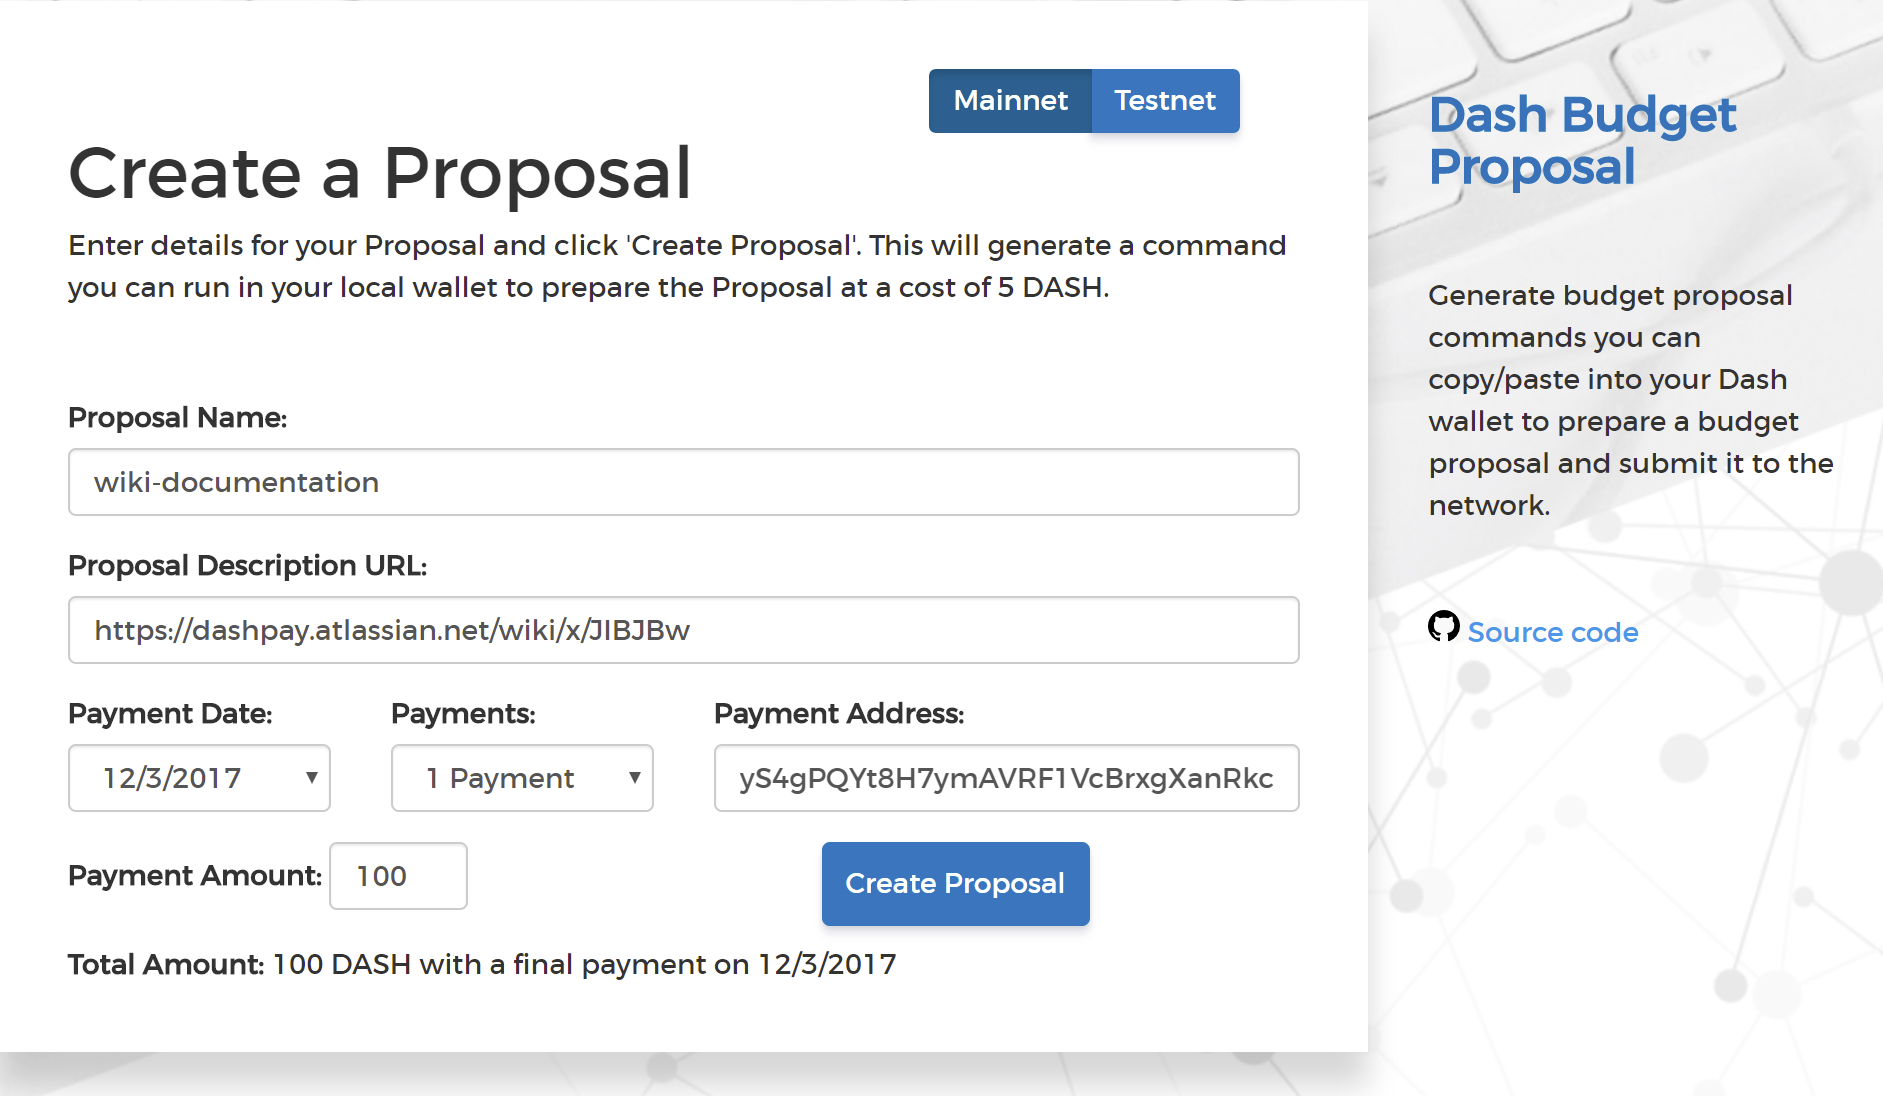
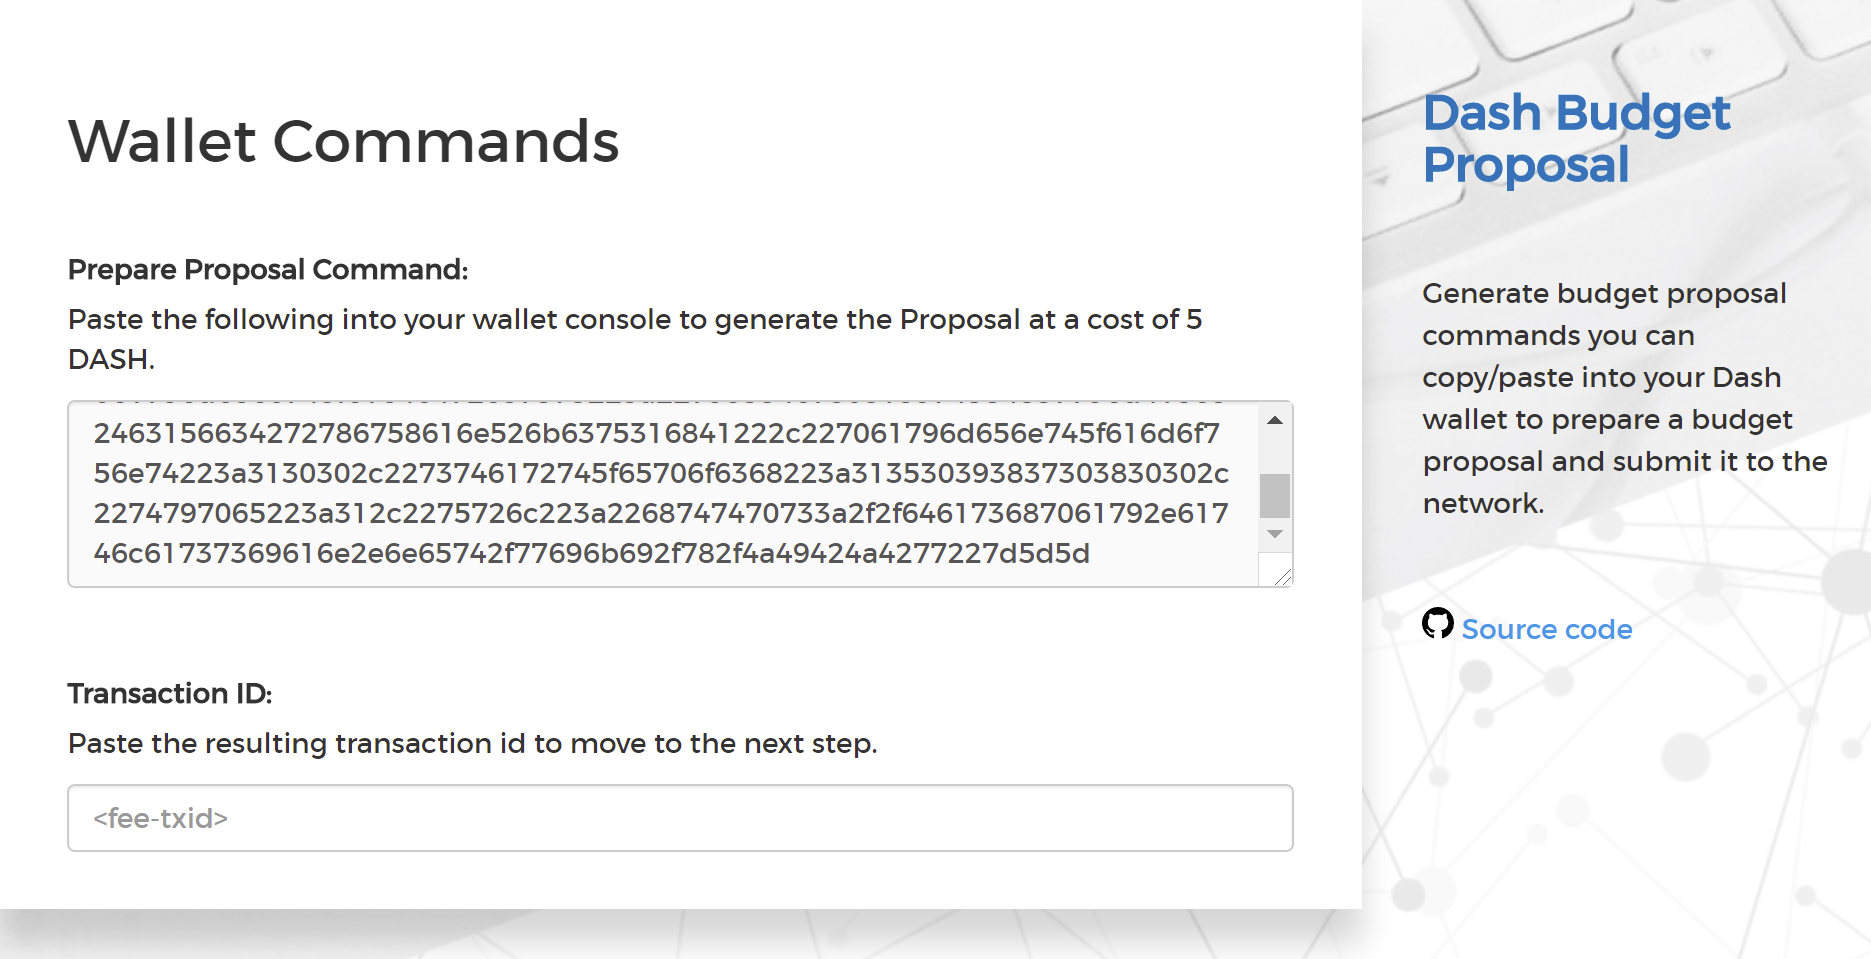
Steps 1 & 2: Creating your proposal and preparing the command#
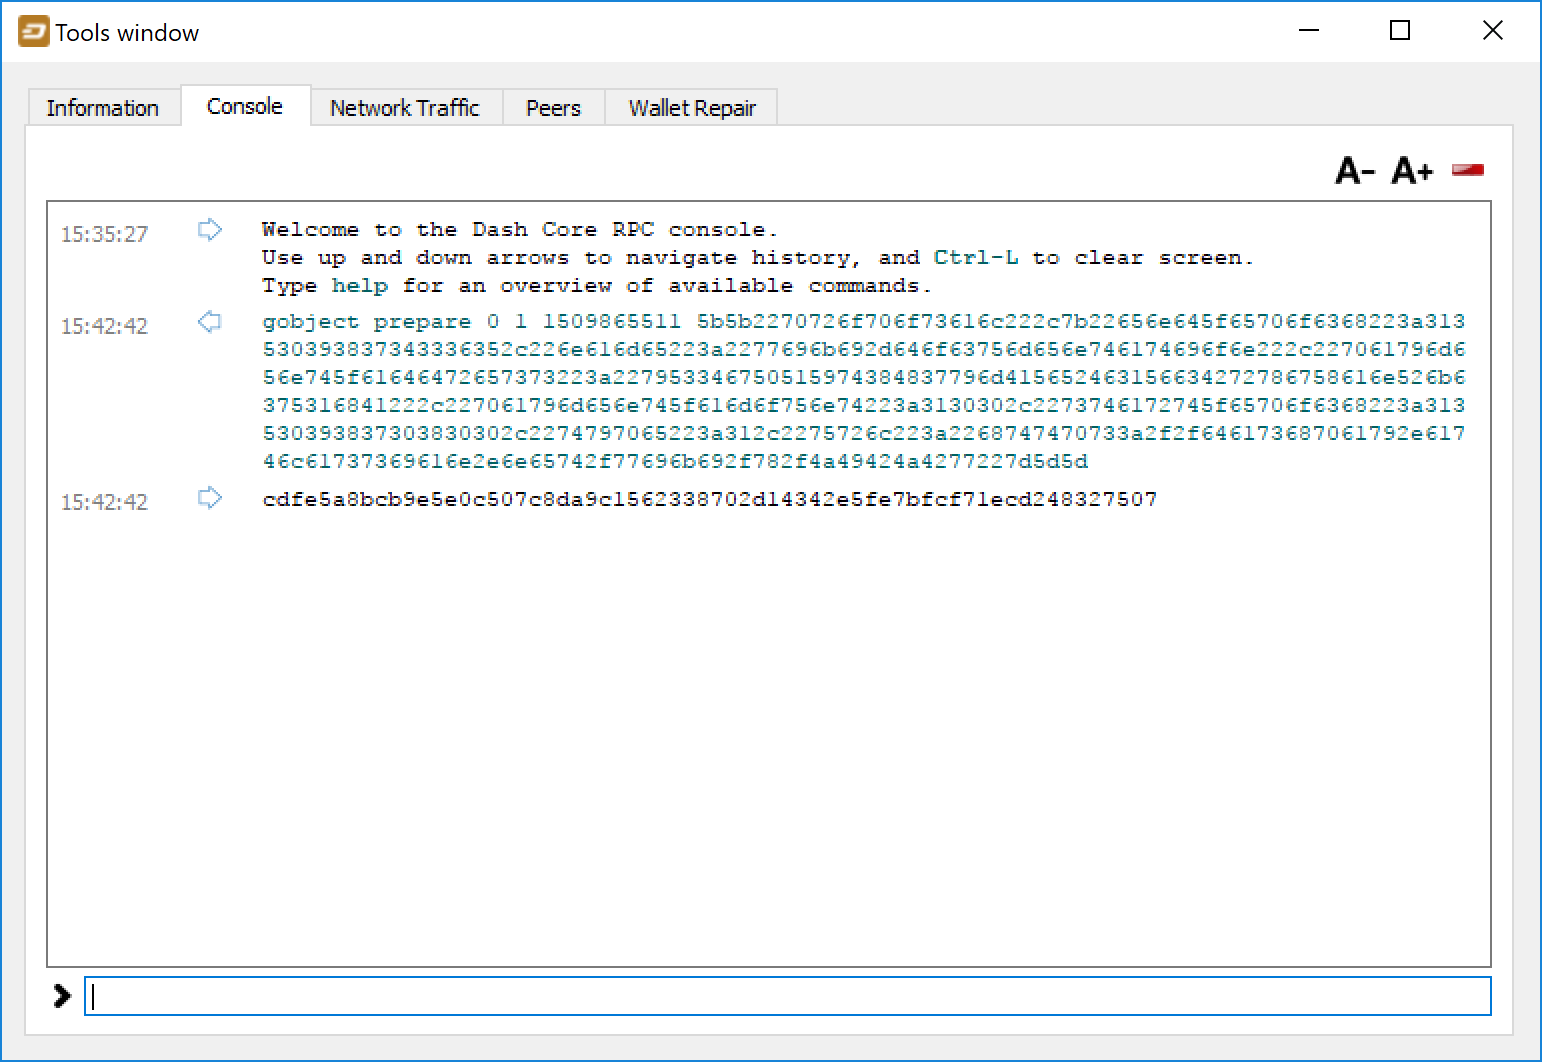
Next, the proposal generator will provide you with a command to run from the console of your Dash Core wallet to prepare your budget proposal governance object. Running this command will cost you 1 DASH, which will be “burnt” or permanently removed from circulation. This one-time fee protects the governance system from becoming overwhelmed by spam, poorly thought out proposals or users not acting in good faith. A small transaction fee is charged as well, so make sure slightly more than 1 DASH is available in your wallet. Many budget proposals request reimbursement of the 1 DASH fee.
First unlock your wallet by clicking Settings > Unlock wallet, then open the console by clicking Window > Console and paste the generated command. The transaction ID will appear. Copy and paste this into the proposal generator response window. As soon as you do this, the system will show a progress bar as it waits for 6 confirmations as follows:
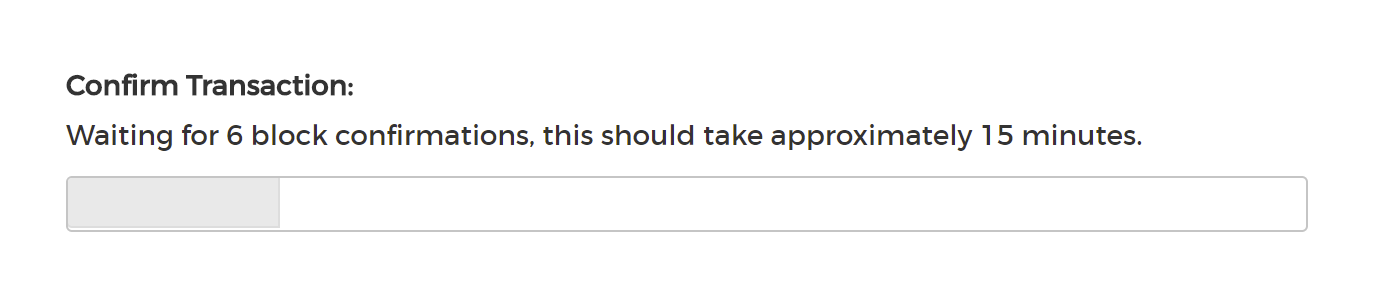
Step 3: Creating the proposal transaction and waiting for 6 confirmations of the transaction ID#
Once 6 block confirmations exist, another command will appear to submit the prepared governance object to the network for voting. Copy and paste this command, and your governance object ID will appear as follows:
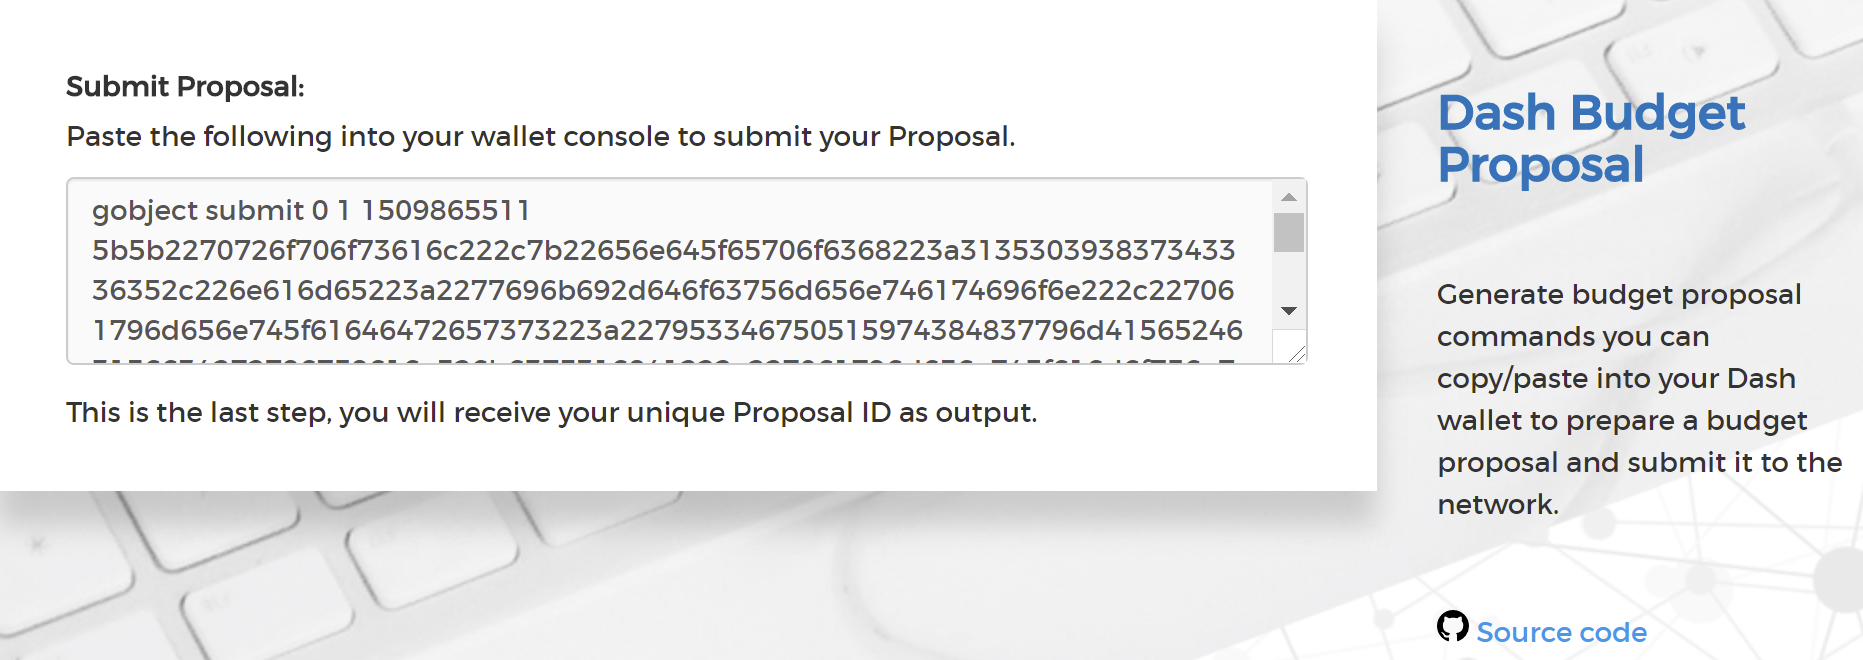
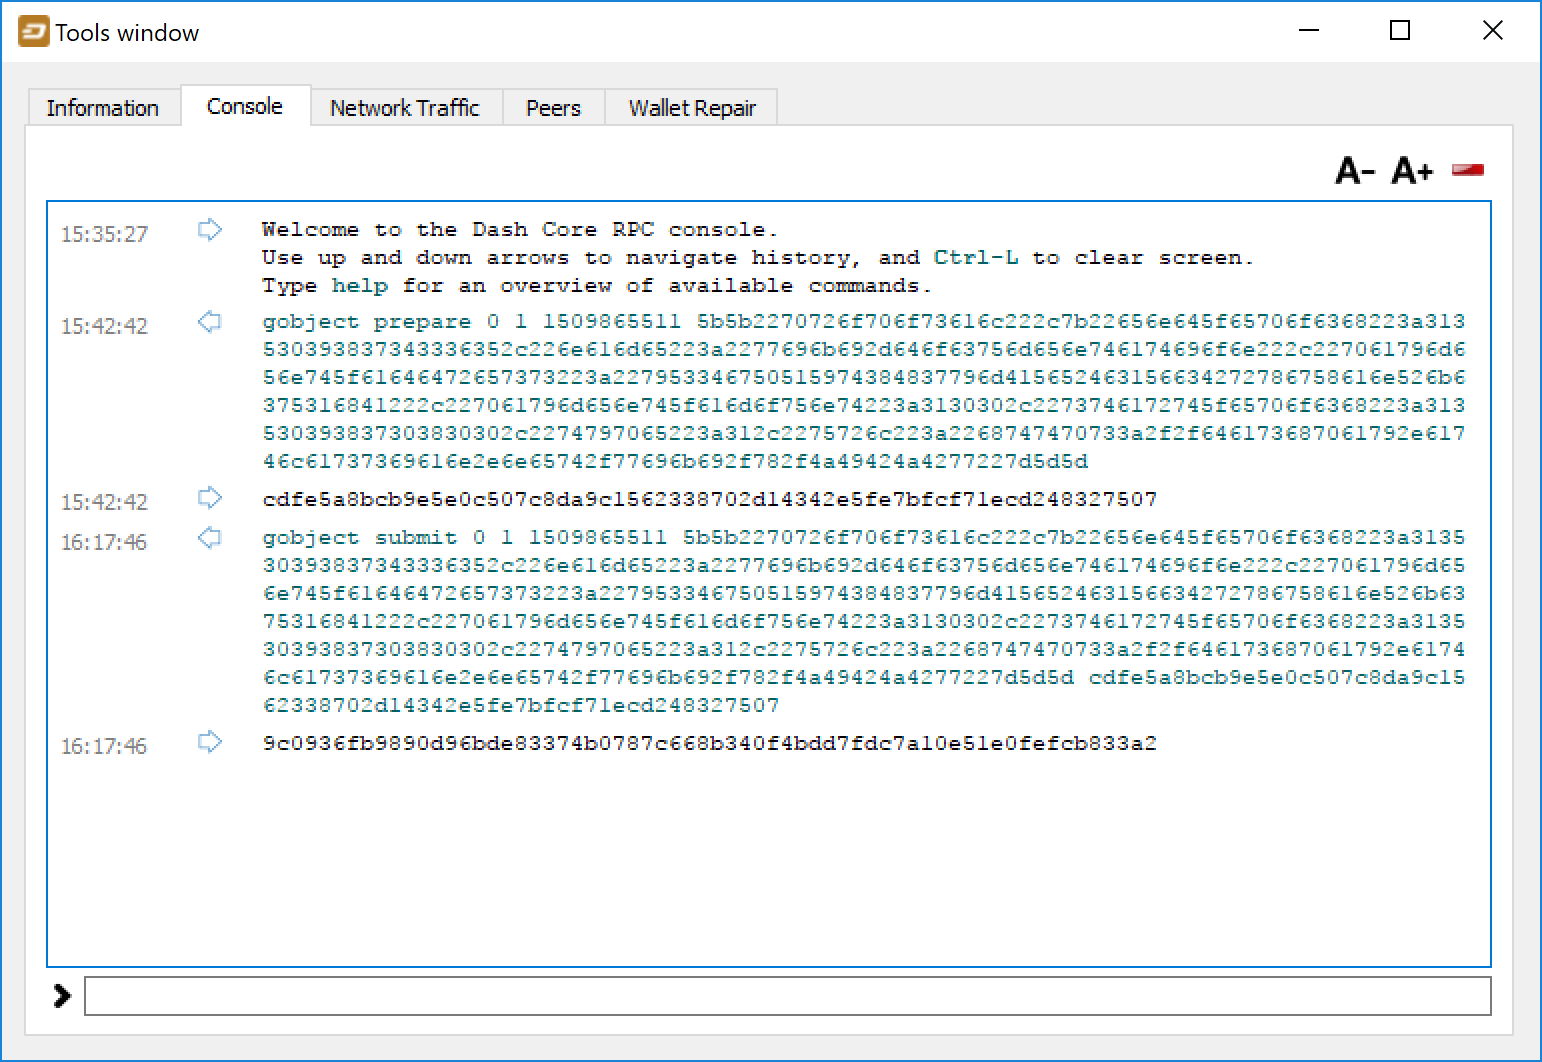
Step 4: Submitting the governance object to the network#
You can use this ID to track voting on the proposal until the budget closes and you receive your payout. You can also submit the ID to DashCentral to claim your proposal and enable simplified voting for masternodes using DashCentral voting services.
Dash Core Wallet Console#
Creating a proposal using the wallet console follows the same process as using the Dash budget proposal generator, but it requires several additional steps to manually construct the proposal governance object.
Assemble the proposal data#
To prepare a proposal, put the proposal details such as name and payout address into a JSON object similar to the example shown below.
{
  "name": "Test-proposal_1",
  "payment_address": "yd5KMREs3GLMe6mTJYr3YrH1juwNwrFCfB",
  "payment_amount": 10,
  "url": "https://www.mydashtestproposal.com",
  "start_epoch": 1635750000,
  "end_epoch": 1636750000,
  "type": 1
}
Set the type field to 1 for all proposals.
The start_epoch and end_epoch fields are Unix epoch timestamps
indicating the time range in which the proposal can receive payments. Typically
you will set the start_epoch to approximately halfway between the superblock
where payment is first desired and the preceding one. Set end_epoch to
approximately 2 weeks after the superblock where the final payment is desired.
You can use a site like https://www.epochconverter.com/ to convert the start and
end dates to the epoch values for these fields.
Serialize the proposal data#
The proposal information must be serialized to hex before it can be submitted to the network. Remove all spaces from the JSON object:
{"name":"Test-proposal_1","payment_address":"yd5KMREs3GLMe6mTJYr3YrH1juwNwrFCfB","payment_amount":10,"type":1,"url":"http://test.com","start_epoch":1635750000,"end_epoch":1636750000}
Convert the resulting JSON to its hex equivalent. Sites like https://codebeautify.org/string-hex-converter provide an easy way to do this:
7b226e616d65223a22546573742d70726f706f73616c5f31222c227061796d656e745f61646472657373223a227964354b4d52457333474c4d65366d544a597233597248316a75774e777246436642222c227061796d656e745f616d6f756e74223a31302c2274797065223a312c2275726c223a22687474703a2f2f746573742e636f6d222c2273746172745f65706f6368223a313633353735303030302c22656e645f65706f6368223a313633363735303030307d
Prepare the fee transaction#
Finally, open your Dash Core wallet console and use the gobject prepare
command to complete the proposal preparation and submit the fee
transaction (a 1 DASH coin burn). See the Core developer documentation for additional details.
Warning
Running this command will create a transaction burning 1 DASH from the wallet as the proposal fee. This burn is irreversible. Only run this command once you have verified all the proposal information. The transaction is not reversible once sent.
gobject prepare <parent-hash> <revision> <time> <data-hex>
parent-hash- set to0revision- set to1time- set to the current Unix epoch time (does not have to be precise)data-hex- set to the hex string from the previous step
Example command:
gobject prepare 0 1 1636000000 7b226e616d65223a22546573742d70726f706f73616c5f31222c227061796d656e745f61646472657373223a227964354b4d52457333474c4d65366d544a597233597248316a75774e777246436642222c227061796d656e745f616d6f756e74223a31302c2274797065223a312c2275726c223a22687474703a2f2f746573742e636f6d222c2273746172745f65706f6368223a313633353735303030302c22656e645f65706f6368223a313633363735303030307d
The command will execute and respond with a transaction ID for the fee burn:
9192fb57953baba168f685e32378aa6471061301a097598c68ef1a4c136c9ea3
Submit the proposal#
Once the transaction has six confirmations, use the gobject submit command
to submit the prepared governance object to the network for voting. Submission
after one confirmation is also possible, but the proposal remains postponed
until the fee transaction has six confirmations. See the
Core developer documentation for additional
details.
gobject submit <parent-hash> <revision> <time> <data-hex> <fee-txid>
parent-hash- use the same value as in thegobject preparecommandrevision- use the same value as in thegobject preparecommandtime- use the same value as in thegobject preparecommanddata-hex- use the same value as in thegobject preparecommandfee-txid- the transaction ID returned by thegobject preparecommand in the previous step
Example command:
gobject submit 0 1 1636000000 7b226e616d65223a22546573742d70726f706f73616c5f31222c227061796d656e745f61646472657373223a227964354b4d52457333474c4d65366d544a597233597248316a75774e777246436642222c227061796d656e745f616d6f756e74223a31302c2274797065223a312c2275726c223a22687474703a2f2f746573742e636f6d222c2273746172745f65706f6368223a313633353735303030302c22656e645f65706f6368223a313633363735303030307d 9192fb57953baba168f685e32378aa6471061301a097598c68ef1a4c136c9ea3
The command will respond with the governance object hash, which can be used to track voting on the proposal:
3108b76c8735132a0b6de856b434a40d75924ba0a535c4a61be4dba0bf83263f
Voting on proposals#
Vote at least 1662 blocks (approximately three days) before the superblock. Masternodes begin choosing which proposals to pay at this point, so later votes may not affect the upcoming payment.
Voting on DAO proposals is an important part of operating a masternode. Since masternodes are heavily invested in Dash, they are expected to critically appraise proposals each month and vote in a manner they perceive to be consistent with the best interests of the network. Each masternode can vote yes, no or abstain on each proposal. You can normally change your vote on a proposal once per hour. A regular masternode’s vote counts as one vote, while an evonode’s vote counts as four. The following sites and tools are available to view and manage proposals and voting:
For information on how to create a proposal, see here.
DashCentral#
DashCentral provides proposal discussion and voting services. Follow the service’s current instructions to configure voting. Use your masternode’s voting key when setting up voting services. Anyone with access to this key can vote on your behalf.
When you are ready to vote, go to the budget proposals page. Simply click to view the proposals, then click either Vote YES, Vote ABSTAIN or Vote NO.
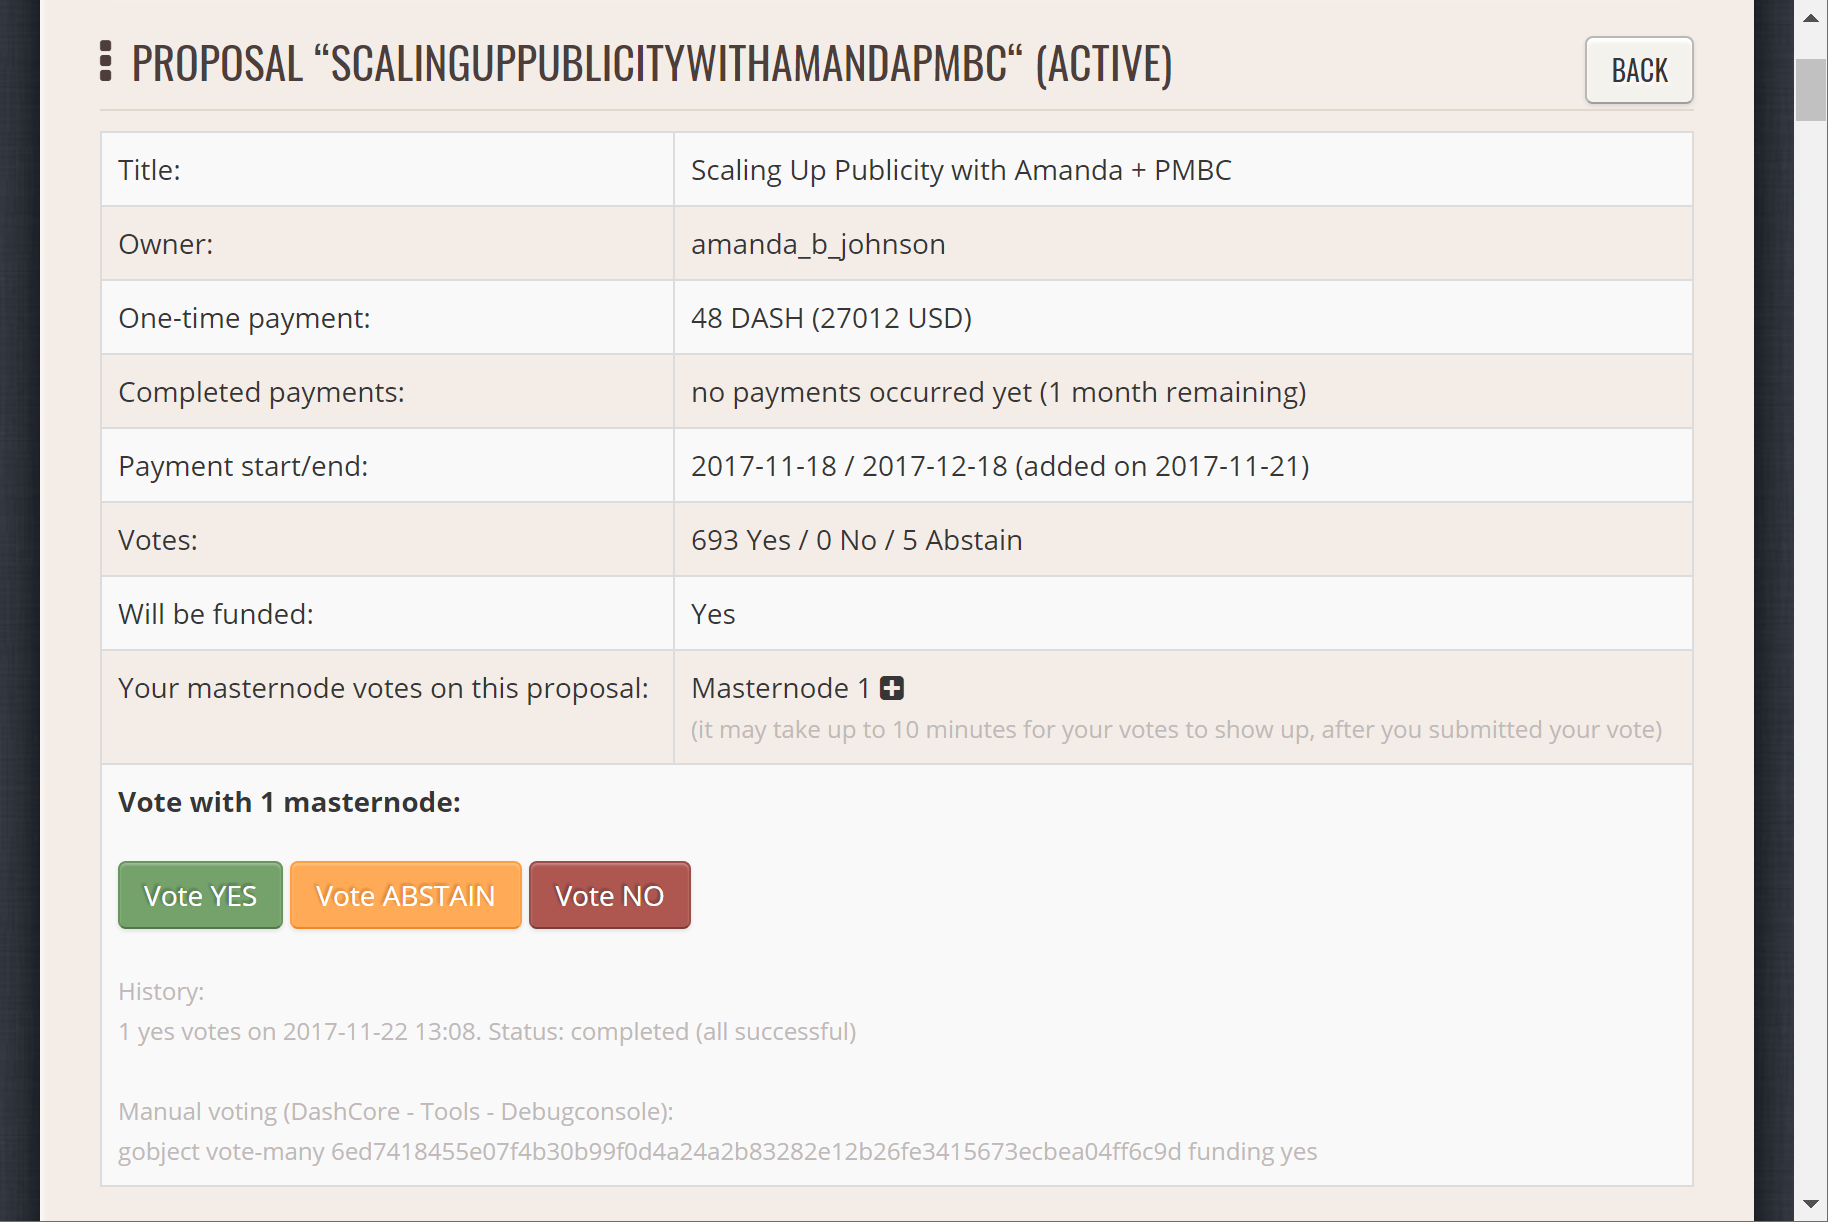
Voting interface on DashCentral#
Dash Masternode Tool (DMT)#
If you started your masternode from a hardware wallet using DMT, you can also use the tool to cast votes. Click Tools > Proposals and wait for the list of proposals to load. You can easily see the voting status of each proposal, and selecting a proposal shows details on the Details tab in the lower half of the window. Switch to the Vote tab to Vote Yes, Vote No or Vote Abstain directly from DMT.
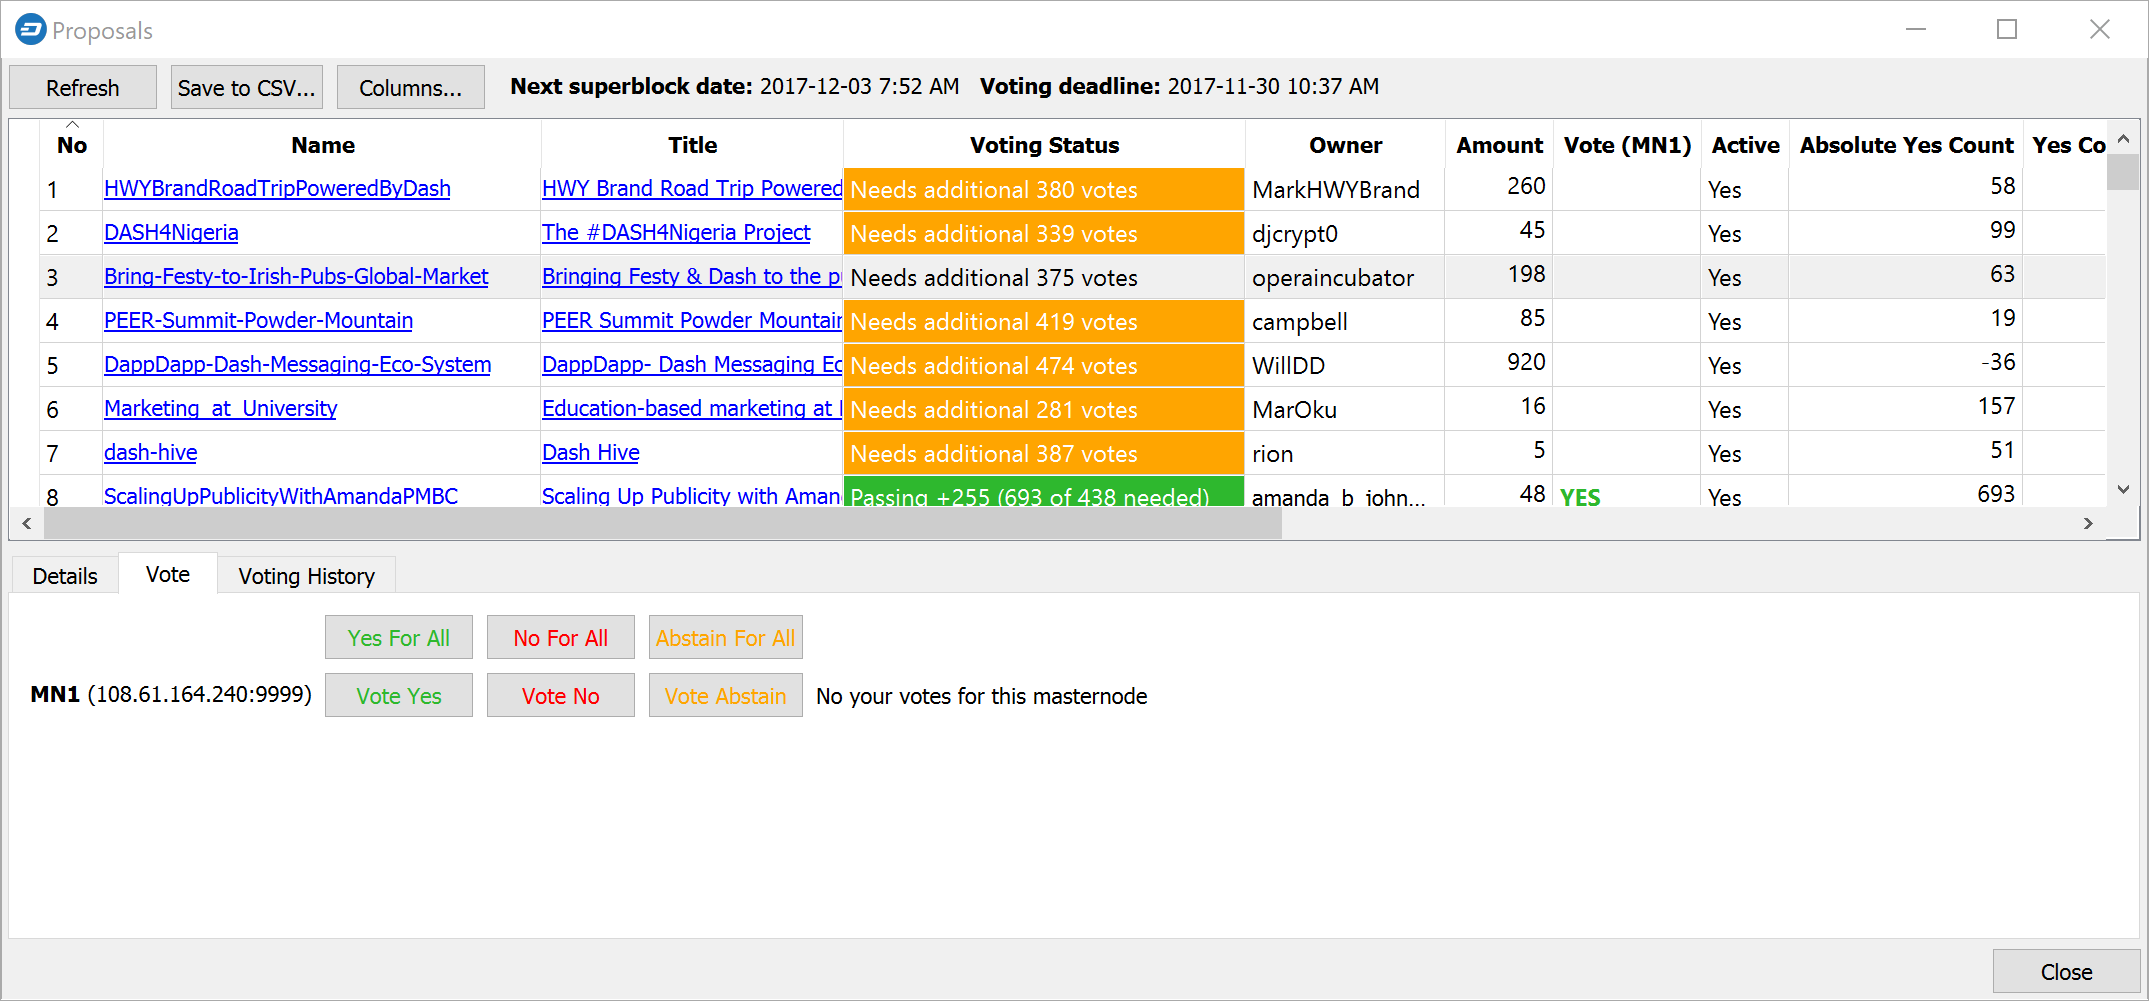
Voting interface in DMT#
Dash Core wallet or masternode#
To vote from the Dash Core wallet console or through dash-cli, the wallet
must contain the private key for your masternode’s registered voting address.
Unlock an encrypted wallet before voting.
Use gobject list to find proposals and their IDs (shown as hashes):
gobject list
To vote with every valid masternode whose voting key is present in the wallet,
use one of these commands, replacing <proposal-hash> with the proposal’s
actual proposal ID:
gobject vote-many <proposal-hash> funding yes
gobject vote-many <proposal-hash> funding no
gobject vote-many <proposal-hash> funding abstain
To vote with one masternode, use vote-alias and supply its ProTx hash:
gobject vote-alias <proposal-hash> funding yes <protx-hash>
Replace yes with no or abstain as appropriate. The ProTx hash
identifies the masternode registration; it is not the proposal hash.
For command-line use, prefix the command with dash-cli and run it against
the node with the wallet containing the voting key:
dash-cli gobject vote-alias <proposal-hash> funding yes <protx-hash>
Check the response to confirm that your votes succeeded and review any error messages.
Delegating votes#
Masternodes feature a key designated only for voting, which makes it possible to delegate your vote to a representative. Simply enter a Dash address provided by the delegate when registering your masternode, or update your masternode registration to delegate the vote of a running masternode. The wallet controlling the private key to this address will then cast votes on behalf of this masternode owner simply by following the Dash Core voting procedure described above. No further configuration is required.